DIY

Fresh Dill Butter

What do you do when you have an entire bunch of fresh organic dill weed delivered to your door step?  Make dill butter of course!!!  Just use one pound unsalted butter, flake sea salt, and fresh dill then blend with mixer and place into four 4-ounce mason jars.  

P.S. It makes a great hostess gift!  Do an assortment of flavors to hand out for Christmas!

~ Angela O'

download (1).jpg
download (8).jpg
download (9).jpg

Get Rid of Fruit Flies the Classy Way

download (1).jpg

I've been doing this now for a couple years and realized I never shared this saavy tip.  I'd been plagued with fruit flies during the spring months in Austin and didn't know how to rid them.  Never had I experienced them before moving to Austin.  I'd read many stories about how fruit flies live in sinks, etc but never really cared as my only concern get rid of them.  A friend of mine told me that all I needed was to put apple cider vinegar in a bowl and cover it with aluminum foil poking holes through the top.  Well, the idea sounded doable but I liked things to look classy and I hated the idea of having a random bowl with sloppy aluminum foil sitting on my counter all the time.  So I went home and put together a plan of attack.  A couple of days later I had set up permanent fruit fly traps in my home.  Voila!

These classy little fruit fly traps make quite cute gifts during the spring and summer months, just gift them in pairs.  I set them up and leave them for an extended period of time but don't forget to check and refresh them regularly.

Materials Needed:

  • Glass Mason Jars, 4 oz preferred
  • Mason Jar Lids and Rings
  • One nail, 1/4 inch width is good
  • Hammer
  • Apple Cider Vinegar

Instructions:

follow the pictures and enjoy the captions

download (2).jpg

Collect your supplies

download (3).jpg

Hold the nail steady above the jar sealed tightly with lid

download (4).jpg

Hammer the nail in to make a full hole and pull the nail out

download (5).jpg

Just like this!

download (6).jpg

Keep it up until you have a sufficient amount of holes

download (7).jpg

It should look like this

download (8).jpg

Pour in the apple cider vinegar to about half full; don't fill up!

download (9).jpg

Like this!

download (10).jpg

Look at those nasty buggers!

download (11).jpg

Rust will happen on the inside.  That's okay.  You can reuse the rusty holed lid as many times as you wish when refilling the vinegar because it will evaporate and be full of bugs.  Just throw the lid away when you are ready to make a new lid.  You won't need to redo everything.

Purchase the 4 ounce mason jars and apple cider vinegar here!

~With Angela O'

Travel Tic Tac Toe

Original DIY Tic Tac Toe travel game board from the 1990's

download (16).jpg

I loved this DIY Tic Tac Toe traveling game so much as a child that I still have the original game that I made.  It's super easy to make for your child and even with your child that you may feel brave enough to have a large group of kiddos over to instruct.  Adult Child Group Fun!  a.k.a. birthday parties, project parties, rainy days, etc.  The best part... The game board and playing pieces are made out of felt so that when playing in the car, the pieces are not lost. So clever.

I think I was about 6 to 8 years old, so I believe it was my awesome Sunday School teacher Denise Kistner who instructed our class to make this project.  I don't want to leave out Connie Hester either...just in case it may have been her as she was another one of my awesome Sunday School teachers.  Kudos!

Make it yourself using the instructions below.

download (17).jpg

The felt pieces don't fall off when tipped over

download (18).jpg

Write the kid's name and a message of your choice

Materials Needed:

  • Felt, 4 different colors
  • Pinking Shears
  • Foam Core Board
  • Glue
  • A Permanent Marker
  • Gallon Size Zipper Bag

Instructions:

  • Measure the foam core board to 8 inches by 8 inches and cut.
  • Write a message on the back on the side you have determined to be the back of the board.
  • Measure felt color #1 and cut with the pinking shears. Approximately 8 inches by 8 inches (make sure it's large enough to cover the board!).  Once cut, glue this to the foam board.  Gluing it now will allow it to have some time to set prior to adding the next layer.
  • Measure strips from felt color #2 and cut using the pinking shears. Approximately 1/2 inch by 8 inches.  Not too thick, not too thin.  If the fabric is cut with the pinking shear points lined up then the width may go a little over a half inch, that is okay.  Make 4 of these.
  • Measure rectangles from felt color #3 and cut using the pinking shears.  Aproximately 1 inch by 1 3/4 inch.  Again this is approximate, the main point to remember is to make sure the pieces are large enough for hands to pick up easily but small enough for them to fit inside the tic tac toe boxes. Make 5 of these and perhaps one back up if you'd like.
  • Measure circles from felt color #4 and cut using the pinking shears. Approximately 1 1/2 inch by 1 1/2 inch.  Again this is approximate, the main point to remember is to make sure the pieces are large enough for hands to pick up easily but small enough for them to fit inside the tic tac toe boxes.  Make 5 of these and perhaps one back up if you'd like.
  • Glue the measured strips that you cut from felt color #2 to the felt covered foam board, using the lattice style method.
  • Do NOT put your foam rectangles/circles on the foam board until you know the board has completely dried.  You wouldn't want to accidentally glue pieces to the board making them permanently unplayable, would you?
  • When complete, store in a zipper bag and keep it in the family car.

With Angela O'

download (19).jpg
download (20).jpg

Make at least 5 pieces each shape

download (21).jpg

BAG IT AND STICK IT! in the car

Not Gun Shy at Christmas

When it comes to wrapping gifts for Christmas, I am certainly not gun shy.  Each year I wrap hundreds of gifts (personal and professional) and it requires some creativity.  I certainly want each gift to look their best and be individualized.  However, when using the full glitter wrapping paper no matter how beautiful it may be it is complete pain in the next to work with.  Because of the layers of glitter and adhesive used in the manufacturing process of that wrapping paper roll it does not want to stay folded and even worse no tape will hold it in place.  That is when I pull out the big guns!  A hot glue gun, glue sticks, extension cord and poster board save the season.  I may come out with a few burns but I gotta do what is necessary!

Well, another trick to add to the list.  Check.

download (25).jpg
download (26).jpg

Check out those perfect glitter folds!

download (28).jpg
download (29).jpg
download (30).jpg

Better than a Pedi

This spring my feet are going to be better than ready for those pretty little Michael Kors flip flops.  I personally do not like getting pedicures because they are uncomfortable.  I love having cuticle work done to hide any yuckiness but I cannot have my nails shaped by a technician because I'll be in pain for two weeks following the pedicure.  In addition, I have eczema so submerging my feet into a tub of hot water for more than a minute is quite tortuous.  Those of you who are plagued by eczema hear my sorrows.  

So when a friend told me about a product that her spa was featuring I was quite skeptical.  I was even more hesitant because I was sitting in that dang tub of hot water while she was pedicuring my feet for that annual-must-have-my-feet-done-once job.  Obviously, I was smiling through gritted teeth as she explained the product.  With my skin being super sensitive and having eczema as the sour cherry on top, I have learned through many years of trial and error that products with fragrances, chemicals, and even "great for you botanicals" and the most natural forms of "good" are usually a bad, very BAD idea.  Trust me, I'll break even out with non-comedogenic products and sensitive shave products tend to ignite my skin.

Listen, I figured I'd give it a try.  She was sweet enough to make my one pedicure at this lush, highly sought after and frequented by celebrities Austin spa a birthday gift to me.  So why couldn't I humor her and give it a whirl.  Well, I am glad I did because now I never have to have another pedicure!  

Introducing....

Baby Foot

download (35).jpg

Photo Credit: Amazon.com

Baby Foot is an exfoliant foot peel.  Never heard of it? Think of facial peel for your feet.  The first best benefit about Baby Foot is that you can apply the foot peel at home in one hour.  A box of Baby Foot includes one application of two gel holding booties.  Go home one night and apply the booties to your feet, put socks on over the booties to hold them nice and taught and then turn on the television and watch an episode of Mad Men or Sex and the City.  The second best benefit

 is that it works in through layers of dead skin to where a pedicure technician could never explore.  Seriously.

So how does it work exactly?  Baby Foot is made to naturally exfoliate the dead skin cells off of your feet.  When you remove the booties you will need to thoroughly wash off the gel and then let your feet dry.  Over the following 5 to 7 days you will fill a drying effect on the foot skin which is completely non-bothersome unless you have a foot patch of eczema which you can easily remedy by applying moisturizer to the patch.  Around the fifth to seventh day, you will notice your skin starting to peel around your feet and ankles.  This process may take up to two weeks.  My suggestion from personal experience is that you should continue with your daily showers and use a wash cloth to lightly rub and help remove the already loosened dead skin during that daily shower.  Don't use excessive force or pick unnecessarily at the skin but the wet wash cloth will help to remove the loose dead layers.    

Word of Advice:  During these two weeks you do not want to be wearing sandals, open-toe or open-back shoes of any kind.  Why would you want anyone to see that nasty mess you have been harboring for so long?  

The photos that I would never dare to share.  Only for your benefit of understanding the product are you allowed to view these scary candid shots.  Ahhh!!  I had no idea there was so much dead skin.  The loose skin was not visible prior to baby foot but all the nasty cracks were!!  You can see the baby soft new skin with zero cracks underneath.  Today my feet are gorgeous and yours can be too!  

For purchase, please click on my referral link below so that a portion of these proceeds supports my blog.  

Angela O'

Horribly Up Close and Personal :

download (36).jpg

dead skin layers removing from feet and leave baby soft skin

download (37).jpg

dead skin layers removing from feet and leave baby soft skin

Baby Foot Deep Exfoliation For Feet peel, lavender scented,2.4 fl.oz.

New York City Party


Earlier this year I organized a New York City themed party for a high school Post Prom (after prom) event.  I ordered cardboard stand-ups online and made a few other decorations.  The food bar included popcorn with a 1920's styled machine, bagel bites (NYC Pizza), hotdogs (Coney Island), Pretzels, Apples and Jelly Beans.  Ice cream bars were part of the plan but we decided to avoid the mess and served a tray of cookies instead.  I handmade man holes by using aluminum foil, cardboard, glue, paint, foam alphabet stickers and $1.00 round pizza pans from the Dollar Tree.  One activity that was planned was New York City trivia.  After a long search I determined that I could not find a satisfactory trivia game for NYC so I decided to make one and today I am sharing it with you. 


~ With Angela O'

_______________________________________________________________


NYC Tourist Photo Center

NYC Decorations


NYC Decorations

NYC Food Carts

Pizza, Popcorn, Pretzels, Bagels, Giant Pickles, and Other Cart Goodies

Old Fashioned Popcorn Machine

NYC Mocktails for Underage Guests

A Bit of Breakfast for Morning Survivors

_______________________________________________________________


Manholes:

Completed Manhole. (See larger photo at end of this blog post)


$1.00 Pizza Pan from Dollar Tree


Cut cardboard pieces glued on to pan.  Foam Alphabet Stickers.


_______________________________________________________________


Cash Cab Trivia:


1.  What supernatural action movie from the 1980’s starring Bill Murray filmed a scene inside the New York Public Library?

A: Ghostbusters


2.  Name three famous talk shows based in NYC?

A: The Tonight Show, Jimmy Fallon, Late Night, The Today Show, 
Rachel Ray, The Colbert Report, Good Morning America
Late Show, The People’s Court


3.  What actress is famous for her little black dress, black gloves, sunglasses, and her up-do when she walks up to Tiffany & Co. with a pastry in her hand?

A: Audrey Hepburn

 4.  Name the four female characters of Sex and the City?

A: Carrie Bradshaw
Charlotte York
Miranda Hobbes
Samantha Jones

5.  Name three epic film couples of New York City.

A: Carrie Bradshaw & Big – S&TC
Chuck Bass & Blair Waldorf – Gossip Girl
Ross Gellar & Rachel Green – Friends
Maria & Alan – Sesame Street
Peter Park & Mary Jane Watson – Spider Man
Jay Gatsby & Daisy Buchannan – The Great Gatsby

6.  What show holds the record for the longest-run in the history of Broadway?

A: Cats

7,  List two old-timer shows that were set in New York.

A: I Love Lucy, The Dick Van Dyke Show, Welcome Back, Kotter
Different Strokes, Bewitched, Family Affair
All in the Family, The Cosby Show

8.  What was/is the tallest building in Manhattan?

A: One World Trade Center

9.  What are the names of the pizza-loving, crime-fighting, skateboarding turtles that reside in the sewers of NYC?

A: Leonardo, Michaelangelo
Donatello, Raphael

 10.  What show is famous for their deliveryman who drives a brown truck dropping off packages before coming home to his wife in Queens?

A: The King of Queens

11.  What show about nothing was filmed and takes place in NYC?

A: Seinfeld

12.  Which animated tv show that takes place in the year 3000 (aka the 31st century) takes place in New York? 
A: Futurama

13.  Who plays Doug Heffernan in The King of Queens?  He also played in Grown Ups and Mall Cop.

A: Kevin James

 14.  In what community does Peter Parker live with his Aunt May?

A: Forest Hills, Queens NY

15.  What currently aired television series takes place in NYC during the 1950’s through the 1970’s?

A: Mad Men

 16.  What is NYC’s nick name?

A: The Big Apple

17.  What movie took place in New York during the Revolutionary War era? Hint: It starred Johnny Depp

A: Sleepy Hollow 

 18.  List how many and name the professional football teams in the state of New York.

A: NY Giants
NY Jets
Buffalo Bills

19.  Who is the biggest rival team of the New York Yankees?

A: Boston Red Sox

 20.  Name the two baseball teams in NY.

A: NY Mets, NY Yankees

21.  What is the name that is collectively used for the 5 communities that make up New York City?

A: The Boroughs

 22.  What are the five boroughs of NYC?

A: Manhattan, The Bronx
Brooklyn, Queens, Staten Island


23.  What NYC baseball team did Jackie Robinson play for in the late 1940’s to mid 1950’s?

A: The Brooklyn Dodgers

24.  How I Met Your __________ takes place in NYC with the architect named Ted and the Canadian news anchor named Robin?

A: How I Met Your "Mother"

25.  What foods are NYC most known for?

A: Bagels & Pizza

26.  The famous movie featuring Macy’s and the Macy’s Parade during the Christmas season, took place on what street?
Hint: Miracle on ______ Street

A: 34th

27.  What movie starred Audrey Hepburn at a now extremely famous jeweler in 1961?

A: Breakfast at Tiffany’s

 28.  What large animal is legend to live in the sewers of Manhattan?
Hint: Because people would flush these down the toilet as baby pets

A: Crocodiles

29.  Who directed The Godfather?

A: Francis Ford Coppola

 30. Who played the Don in The Godfather?

A: Marlen Brando

31.  Who played Michael Corleone in The Godfather?

A: Al Pacino

32.  Home Alone 2 is _______ in New York.

A: Lost

33.  This Real Estate Tycoon is famous for his tagline “You’re Fired” on The Apprentice.

A: Donald Trump

 34.  What NBA team does Jay-Z partially own?

A: The Brooklyn Nets

35.  Name three films that New York City is devastated?

A: King Kong, Independence Day, Planet of the Apes,
Armageddon, End of the World, Godzilla,
        Ghostbusters, The Day After Tomorrow,
War of the Worlds, I am Legend, Cloverfield


_______________________________________________________________


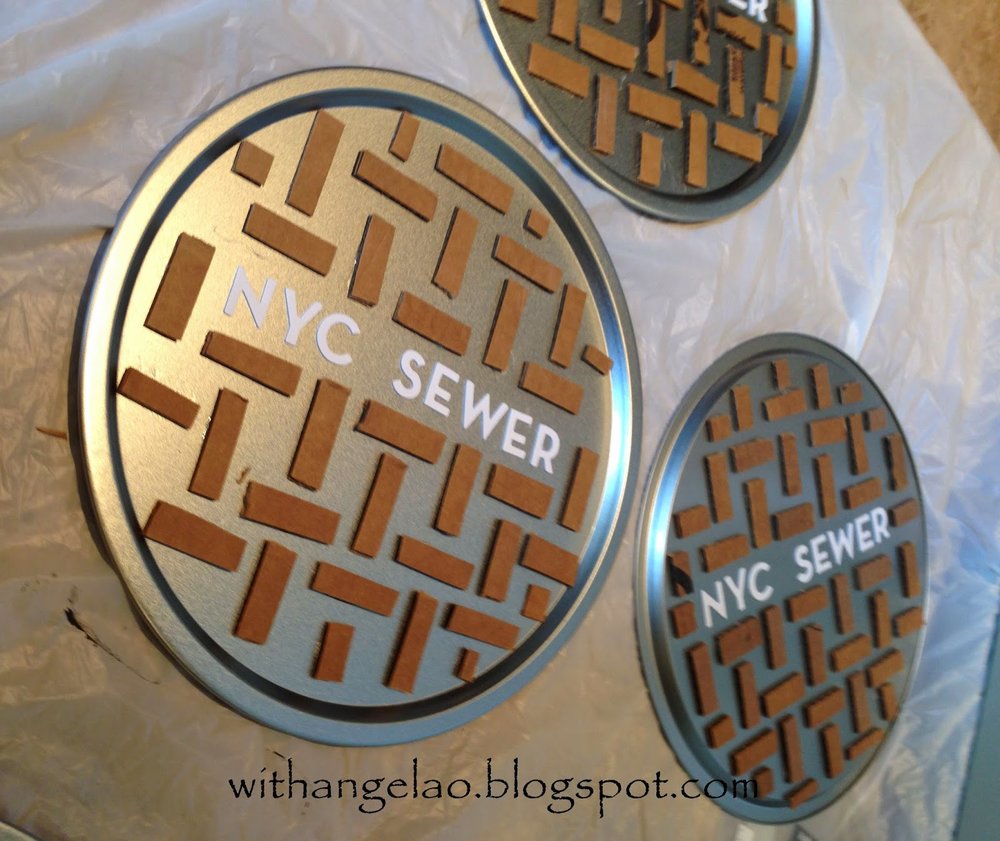
Zoomed View of Manhole.  Finished by covering with aluminum foil, pressed and then grey paint.


Sticker Storage

I'll admit I am sticker crazy.  I loved to put stickers all over snail mail as a young child and still do!  But there was also a time when I was an extreme scrapbooker which required a ridiculous amount, more of an over-abundance of stickers.  After 15 solid years of hardcore scrapbooking I got burned out and I demoted myself to paper-crafting only.  Literally fifteen years of scrapbooking, from 15 years old to 30 years old, from 1998 to 2013.  During that time, I created a divided sticker box to control the clutter and to make them easy to find.  

 No longer do I own this box but I wanted to share with you a great way to organize your stickers.  This is perfect for anyone who owns stickers, not just scrapbook and paper-craft hobbyists.  We are all too well aware of how sheets of stickers can become overwhelming to take care of.

**Disclaimer** This is not my best work.  I created the box years ago with whatever I had lying around the house and did not use exact measurements.  Please excuse the sloppiness.


Materials Needed:
Large storage box 
Poster board
Pencil or Pen
Self-Adhesive Tabs
Ultra Fine Sharpie
Staples
Stapler


Titles to List on Tabs:
Letters
Words
Phrases
Quotes/Sayings
Celebrate/Party
Seasons
Holidays
Travel
Family
Animals/Pets
Food
School/Education
Wedding/Religious
Flowers/Nature
Hearts/Romance
Fashion
Vellum 
Borders/Designs
Congratulatory
"Licensed" (for things like Major League Baseball or Disney)


Instructions:
1. Measure the poster board down to whatever size you need to fit inside your box.  Make sure you have cut enough for all of your categories.
2.  Hand write or type the categories for your tabs.
3.  Attach the tabs with staggered positioning so that they are easy read.
4. You may need to reinforce the tabs with staples.


Tips:

  • Use a fun fabric covered storage box.  These are easily found for a low price at stores like Home Goods, Marshalls, and T.J. Maxx.  
  • Create as many tabs as necessary for your collection.  Everyone's is different.
  • Putting all vellum embellishing sheets in one tab makes it easier than several separate tabs for pictures or sayings.  Unless you are making a separate box just for vellum.
  • "Licensed" would be for various stickers like Major League Baseball or Disney.
  • Label the outside of the box as "Stickers" for easy access.

Fabric box with fabric lid


Various titles are labeled and staggered.

All Vellum in one area

Due to tabs not adhering well, I stapled them in place


~With Angela O'


DIY Glam Pinatas


Friend and Blog Guest Jenna Holtschulte whipped up these cute pinatas for her sweet baby Micah's first birthday. Super easy to make but the her only requirement: Just make sure you have a little extra time on your hands the day you take on the task. Jenna made this from 100% scratch! However, if you are short for time then you could go to Jo-Ann Fabrics and stock up on the premade paper kraft letters for about $2-$3 each.

The Letters:
Scrap Cardboard Boxes
Pencil
Exacto Knife
Brown Packing Tape

The Fringe:
Glue
Scissors
Tissue Paper
Tacky Glue Pens


This pinata is perfect to hang over the dining room table

The Finishing Touches:  Micah' Gold Bow, Micah is One Cake Topper, The Pom Garland


Pressed Pennies Tastefully Secured


Do you know all those pressed penny machines that people get suckered in to using while they are visiting a tourist attraction?  They are everywhere...Disney, Universal, zoos, aquariums, skyscrapers, some gas stations.  You know?  The ones that you had so much fun as a kid making and your parent couldn't say no because it was the one souvenir that was actually affordable. Fifty-one cents. Two quarters and a penny.  Hopefully you had a shiny penny.

Well, I have a lot of pennies from when I was younger and I really enjoy the memories for each one.  During the first few years of my marriage we were on an extremely tight budget.  If we ever visited a tourist location the trinket that we knew we could afford (and too avoid bringing home excessive junk) were the pressed pennies.  As silly as they were we are delighted to look back at them.  

At home and in the workplace I love having everything exactly in its place.  I do not like junk everywhere but junk itself can be okay if setup tastefully.  I have never had a nice way to store the pressed pennies and I never liked anyone's suggestions.  Even the little penny books sold in the tourist retail stores were out of the question for me.  So for a long time they sat in a photo box on our bookshelf.  Well, eureka!  I happened to come across some heavyweight page protectors that were made for slides and they measured at 2"x2" and were three-hole-punched.  The accessibility to use binders for keepsakes are very important for me. All of my albums have been transferred to cloth D-ring binders by American Crafts.

Materials:
  • Scrapbook Paper
  • Small Labels
  • Acid-Free Marker or Pen
  • Glue Dots, the larger size
  • 2"x 2" Slide-style Sheet Protectors, sized for 3-ring binders
  • Scissors or Fiskers Photo Cutter
  • 3-Ring Photo Album or Binder

Instructions:
Measure the paper down to the size of the protected pocket and cut into the 2"x 2" squares.  Write a description on the label and attach it to the cut paper.  Then secure the penny to the cut paper by using a glue dot.  Super easy and very quick.


This is also a great craft project for kids who collect their pennies!

Angela O'

Girlie Girls & Hair Bows

Hair Bows that are super easy to make!  Most of the materials you probably already in your home.  My now Arizona-based friend Michelle Pettit and I got together one night to make these for a private elementary school's fundraiser.  It was so much fun!  

A sampling of the creations are below.  We did this last October so you will notice that the holidays are making an appearance in a couple of the designs.

Materials Needed: Ribbon, Hot Glue & Hot Glue Gun, Barrettes, and Embellishments


Created by Michelle Pettit

Created by Angela O'


Created by Angela O'

Created by Angela O'

Created by Michelle Pettit

Created by Angela O'

Created by Michelle Pettit

Created by Michelle Pettit


Kick the Bore out of Fundraising

Try adding some creative flair to boring old fundraising.  Here are a few loose change buckets that I created for Coin Campaigns.  The painter style bucket with the bright ribbons and flowers was created Spring of 2013 and the jars with rhinestones were created Spring 2012 using empty OJ bottles, sequins and rhinestones.  Now we have a reason to keep the awesome looking Simply Orange bottles when they are empty without earning the title of hoarder.  Problem Solved.  Since I introduced these awesome jars into our community some of the local fundraising groups have now picked up their gamem I never see boring coffee cans at the cashier's counter anymore.

The group that is fundraising in these photos is Team MorGame for JDRF.  JDRF is a national organization that seeks the cure for Type 1 diabetes.  


"It's a High Tea" ~ Bridal Shower Game & Invites


"It's a High Tea"   
Bridal Shower Game & Invites

These game cards are very simple and make shower appear more elegant.  All you need is card stock, lace, a shaped stamp, a stamp pad, 2 colors of spray paint, hot glue and a base-object (our's are Victorian-Era Teapot, Traditional Teapot, and Teacup made from wood).  I was commissioned by one of my dear best friends early this summer to make 'game cards' for her twin sister's bridal shower.  It was a catered tea at the Fleur De Lys Mansion in St. Louis, Missouri.  Congratulations on your wedding Courtney!

Step 1:

Put down a plastic table-cover onto a flat surface, preferably outdoors.  Lay down the base-object that you will be using.  Spray paint the first color on one side of the object.  You may need to spray light and let dry, repeating for a few coats.


Step 2:

Over the dry base-objects, place a large piece of cut lace over the top. Holding down firmly, spray paint over the top of the lace.  Be careful not to blow the lace away with the spray can pressure or you will ruin your design.


Step 3:
Remove the lace before the paint dries.


Step 4:
Using pre-cut cardstock, position a piece of cut lace on top hot-gluing into place.  Then place the decorated base in the hot-glue puddle.


Step 5:
Stamp a pretty print beside the finished shape, slightly overlapping the lace.  Be sure to have a hard surface underneath or the stamped design will not be even.


Step 6:
Voila! Here you go.  Now if you are using as a game and wish to have them hidden from your guests, place them inside an envelope.  Depending on your guest number, select a few cards to have a special marking on the backside.  This could be a passive game for a door prize.  If your guest has picked a card with the special mark then they get a prize.

If you are using these as an invitation, write out the party information on the opposite side of the decorations.


xoxo,
Angela O'


Newborn Date Night kit

When you have great friends that have become brand new parents, it is common to feel a little helpless in the first few months as they are adjusting to a new routine.  One way to help them feel a little bit in the norm is to provide them with a stay-at-home-date-night kit.  Recently, a pair of our Austinite friends had a baby and the poor little guy was so fussy that we didn't see them after leaving the hospital again till the first six weeks went by.  So we dropped off a little surprise basket at their doorstep to wish them well.  Try it sometime, it's fun!  


Garbage Problems?


Do you have problems with the garbage bag always falling down into the can?  Is the cherry on top the fresh mess in the bottom?  Well my Aunt Shirley has solved the problem.  I found this dandy little trick when I borrowed her kitchen to make a feast one day.  She has no idea that I am sharing it.

Just get the adhesive hooks made by companies like 3M Command and place them upside down on the sides of the garbage can.

Voila!!


A Beatrix Potter Baby Shower


One of my best friends recently gave birth to her first child, a son.  She introduced the first year of his life to many classic nursery rhymes incorporating them in the baby shower, baby nursery, and soon-to-be first birthday celebration.  A connection that she and her twin sister once shared from their childhood nursery.  Unfortunately I could not travel to the baby shower, as it was to be in St. Louis and I had just gotten settled in at Austin.  Her sister was the hostess and I co-hosted games from afar.  I handmade all of the games to be a custom fit for her Beatrix Potter theme.  In addition, I presented them in a way that she could keep them nicely tucked in a box so that when the baby was old enough Mommy and Daddy could play the games with him.  A neat and interactive way to learn the very interesting history of Beatrix Potter.  

Today I would love to provide inspiration to anyone who is tired of the stale games offered in books, online, and at party stores.

Supplies Needed: color printer (or office printing store), scissors, nice scrapbook paper,  8.5x11" sheets of blank & printed paper, glue, metallic marker, organza ribbon, saftey pins, and a scrapbook brad to connect multiple pages (used on the Left/Right game hostess sheet).  Both the Bazill brand Prince Charming blue and the Beatrix Potter print paper were from Archiver's which I purchased in Winter 2011.  They are in 12x12" sheets that I cut down to size.  These papers were used to make the hostess sheets and game cards so that the back was a pretty sight for the guests and guest-of-honor.

I also made hostess instruction cards that were approximately 6x6 inches (12x12 sheet, quartered) so that when the day came each game would run smoothly.  The colors were coordinated to be tied in to the look of the shower but small enough to hold and be discrete.  All you do is print the instructions on computer paper and then past the instructions onto the cut down scrapbook paper for a matted look.


PASSIVE GAME:  Under the Chair 


Before any of the guests arrive place a symbol under one of the chairs so that the guest who will be seated there will later be announced as the winner of a door prize.  I used a printed nursery rhyme picture adhered to textured scrapbook paper, monogrammed with a silver BP to make a small note card that would fit securely under the chair with tape.   


PASSIVE GAME:   "Don't Say Baby"


As everyone arrives be sure to give them a ribbon with safety pins.  Each ribbon has 4 playing pins plus one attachment pin for the guests blouse.  Instruct all guests to not say the word “baby”.  If they are caught saying "baby" they have to give one of their safety pins to the person they said it to.  At the end of the shower, ask the guests to tally up their pins.  Whoever has the most pins wins a prize.  This would be a great game to designate to a co-host to stand at the door to pass out and quickly explain the rule.


ACTIVE GAME:  "Angela's Signature" Left Right Game

Left/Right Game Hostess Sheet - Front & Back

Left/Right Game Hostess Sheet - Front

The hostess will need to use an object to pass around the table, like a flower or stuffed animal. Only one item can be used.  If there are multiple tables then designate one corner of each as the bridge so that the item moves on to the next table smoothly.  The hostess will read the story out loud to the guests.  Each time the guests hear the word “right” or “left” (spelled in many different ways) the guest holding the object will pass the item in the designated direction.  The last person holding the item wins a prize.  Do this game first as it is very active and will get the ladies excited.  Do this while the guests are sitting but before they eat because it is a bit of a riot.

*The Left/Right story is at the bottom of the blog


ACTIVE GAME: Beatrix Potter Trivia 

The Beatrix Potter Trivia Hostess Cards


Beatrix Potter trivia cards.  Use these hostess cards to announce the question.  They are made to look like game show cards.  Give the guests approximately 10 seconds or so to hand write their answer on their own answer sheet.  There are 13 questions, at the end of all the questions the hostess will then announce the answers.  Making sure to  re-read them in the same order.   The person with the most correct wins a prize. 

**Save time by placing the guest blank sheets at the guest seats before they arrive.  Include pens.  This game should be done during eating or after, while at the table.

*The Beatrix potter trivia is at the bottom of the blog


ACTIVE GAME: The 23 Tales

The 23 Tales Hostess Sheet

The guest answer sheet for 23 Tales & BP Trivia

The 23 tales of Beatrix Potter. The hostess will announce to the guests that they will get 4 minutes to jot down as many Beatrix Potter tales that they know on their game sheet once you say “GO”. Once the four minutes are up the hostess will read off the answers from the hostess sheet.  Ask the guests how many they got right.  The person with the most wins a prize.

**Save time by placing the guest blank sheets at the guest seats before they arrive.  Include pens. This game should be done after eating or during dessert, while at the table.


*The 23 Tales List is at the bottom of the blog


PRESENTATION:

An easy way to transport to the shower and to present is to tie organza ribbon on the game cards.  


BP TRIVIA:  All based on my own research of Beatrix Potter

Q: What is Beatrix Potter’s first name? 
A: Helen 

Q: What year was Beatrix Potter born? 
A: 1866 

Q: What was Beatrix Potter’s brother’s name? 
A: Bertram (Walter Bertram) 

Q: What year was The Tale of Peter Rabbit published? 
A: 1901, privately 

Q: How many children did Beatrix Potter have? 
A: 3 

Q: After receiving book proceeds and a legacy from her aunt, what did Beatrix Potter purchase? 
A: “Hill Top Farm” – near Sawry, a tiny village 

Q: How many books did Beatrix Potter publish? 
A: 23 

Q: Beatrix Potter stories have been told in four ways. 1. Song 2. Film 3. Animation and 4. _________ 
A: Ballet 

Q: To earn money in the 1890’s what did Beatrix and Bertram do? 
A: Designed and printed their own Christmas and Special Occasion cards 

Q: What were Beatrix Potter’s “Four Little Rabbits” names? 
A: Flopsy, Mopsy, Cottontail, and Peter 

Q: Finish this title… “The Tale of ______Nutkin” 
A: The Tale of Squirrel Nutkin 

Q: What are two stories that represent Beatrix’s life of Hill Top Farm? 
A: The Tale of Jemima Puddle Deck & The Tale of Tom Kitten 

Q: What was the name of the ballet film released in 1971 and directed by Reginald Miller? 
A: “The Tales of Beatrix Potter”   **This was performed in costume by the Royal Ballet


The 23 Tales

The Tale of Peter Rabbit (1902)
The Tale of Squirrel Nutkin (1903)
The Tailor of Gloucester (1903)
The Tale of Benjamin Bunny (1904)
The Tale of Two Bad Mice (1904)
The Tale of Mrs. Tiggy-Winkle (1905)
The Tale of the Pie and the Patty-Pan (1905)
The Tale of Mr. Jeremy Fisher (1906)
The Story of A Fierce Bad Rabbit (1906)
The Story of Miss Moppet (1906)
The Tale of Tom Kitten (1907)
The Tale of Jemima Puddle-Duck (1908)
The Tale of Samuel Whiskers or, The Roly-Poly Pudding (1908)
The Tale of the Flopsy Bunnies (1909)
The Tale of Ginger and Pickles (1909)
The Tale of Mrs. Tittlemouse (1910)
The Tale of Timmy Tiptoes (1911)
The Tale of Mr. Tod (1912)
The Tale of Pigling Bland (1913)
Appley Dapply's Nursery Rhymes (1917)
The Tale of Johnny Town-Mouse (1918)
Cecily Parsley's Nursery Rhymes (1922)
The Tale of Little Pig Robinson (1930)


Angela’s Signature Game “Right/Left” 
This is a story about Mrs. Wright's baby shower tea party. She lived right at the end of Lefty Lane, the third house on the left. Today, Mrs. Wright was hosting a baby shower tea party. The women would enter left, right through the front door and greet Mrs. Wright, they would head right down the stairs, turning left then right into Mrs. Wright's family room where the mommy-to-be was.


Two of the girls were left-handed so they would sit at the left of the table. Mrs. Wright held up her right hand and all of her friends grew quiet, except the left-handed girl on the right patting Mrs. Wright's dog named Hefty Lefty.


Mrs. Wright asked Sarah Wright and Julie Wright to pass out the teacups starting to the left. Sarah Wright and Julie Wright started out left but turned back because they left the cups just to the right of the table, right next to the spoons. Mrs. Wright said, "That's all right." 

Mrs. Wright began to serve her friends some pie when Grandma Wright smelled the delicious desserts and left her bedroom to join the Wright girls. She went down the stairs and turned left than right, right into Mrs. Wright's family room.

Grandma Wright knocked and entered left and sat in the rocking chair on the left. Sarah Wright and Julie Wright invited Grandma Wright to join them at the table.

Grandma Wright had been to many baby showers as a young girl and right before they realized it, Grandma Wright was telling them stories from when she was the mommy-to-be and went to the right cabinet and in the left drawer were pictures of her baby shower.

As the party ended right on time, they all put their dishes right in the left side of the sink and thanked Mrs. Wright and Grandma Wright for such a wonderful time. Soon, all of the women from the Wright baby shower tea party turned right than left, then left again to return to the front door and out to the right car that they arrived in. Down lefty lane they went. Now who ended up with the right gift?


 **This is considered Angela's signature baby shower game simply because it is always so popular and the guests have so much fun.  I did not create this game but it has been so long since I first used it I can't remember who was the original source.

Mastering a Tiffany Blue Brunch


Mastering a Tiffany Blue Brunch in 3 days was going to be a challenge.  But you know how I love to out-do my challenger.  So here is the scoop.

These tableware pieces are the unofficial, official Tiffany Blue color "Robin's Egg Blue" from the manufacturer Amscan.  Amscan is the parent company of Party City.  Exactly 2 Autumns ago this past September I had the pleasure of visiting the Amscan Corporate Showroom in the gorgeous Westchester County, NY.  There they unveiled their newest party color of Robin's Egg Blue the match to Tiffany & Co.  Of course this color is devoured by brides everywhere but why should brides be the only ladies to enjoy it.


Welcome to the Tiffany Blue Brunch where 17 young ladies celebrated a very special friend's birthday.


I sourced Annie's Cafe, a well-known French bistro in Austin, Texas as the caterer for this event.  Highlights of the brunch were the Ham & Gruyere Frittata and Quiche along with the fresh chocolate croissants.  Each girl enjoyed there juice-tail from stemware making this day a bit more special.


The napkin rings were made using the coordinating Tiffany Blue wrapping paper and pearl/gold scrapbook brads found in the bridal section.

The favor boxes were wrapped in the coordinating Tiffany Blue wrapping paper and hand-tied to present the exact Tiffany bow!  Inside the ladies found a costume pearl & rhinestone bracelet accompined by a bottle of China Glaze's For Audrey nail lacquer. 


The table was to speak solely of Tiffany's, the diamond and pearl decor, the glass "crystal" pitchers and the silver cake stand and platters.

The final touch was the elegant Tiffany box made of fondant cake from Coco Paloma Desserts.  Thank you dearest Paloma for assisting me on this event!  


~With Angela O'


Cedar Sachets to Protect Your Clothes


John and I have been purchasing cedar blocks and balls for our closets and dresser drawers for over a year now and none of them seem to actually keep out the moths.  We have been replacing them and sanding them to refresh the scent but it never lasts.  So this time we decided to make our own cedar sachets.  Yes it does save money because over time you won't have to continuously replace the supplies by purchasing all new products but we did not chosse this method to save money alone.  We were tired of the hassle and our clothes not being protected.  Try this and see how it works.  So far it has worked for us.

Supplies Needed:

*10 inch tulle circles
*1/8 inch Ribbon (Spool)
*Cedar


Just use one circle, put a small handful of cedar shavings in the center, and tie up with ribbon

Tips:

*Get 10 inch tulle circles from the craft store in a 25 pack for only $3.00.  Choose any color you wish.  I used the Gold Rush because I felt that it was the most versatile.  This method is a lot easier than purchasing tulle by the yard in the fabric department.  This way you do not have to worry about cutting the tulle down to the dimensions you need.

*The 1/8 inch ribbon brand Berwick Offray is great for this project and very inexpensive.  Again a wide array of colors to choose from to coordinate with the look you are trying to achieve.

*We ended up purchasing our cedar chips from Petsmart at $7.49.  25 sachets worth barely dented the bag.  You are better off getting with a few friends to split the bag so that you don't have so much left over.  Remember that although this a very cost effective way the primary reason to make your own cedar sachets is so that the cedar scent lasts longer and the repellent is most effective against moths and other insects.

* Tie up the sachets in your closet or tie the ribbon into a bow for those that will sit inside your dresser drawer. 
These are the pre-made blocks we have purchased in the store but after a few days to few weeks are useless

Hand-Dipped Pretzel Rods


Today I made hand-dipped pretzel rods for a cookie exchange.  The process was a lot of fun but did require a lot of patience and detail.  They were a hit tonight and someone even placed an order with me to make them as their gifts to give this week.  What a great night I had with everyone at Lori Post's house.  Thank you so much for your dear hosting!  As always you were wonderful.

What you need:
*Pretzel Bags with Ties
*Pretzel Rods
*Dipping Chocolate - White, Milk Choc, etc
*Decorative Toppings - Andes Mint Chips, Peppermint Chips, M&M minis, Hand-Dyed Coconut Flakes, 
*Icing Bag to Drizzle Chocolate, optional 
*Wax Paper

To Do:
1.  Assemble all of your decorations on flat surfaces ussing cookie trays, serving trays, pizza trays, etc.  Put down sheets of wax paper on the trays, then place your toppings on the wax paper. 


2.  If you are going to hand-dye coconut do that first because you will need to have time to toast and cool down.


3.  Lay down sheets of wax paper on your counter or table so that you can put your dipped pretzels on them to dry. 


4.  Melt your chocolate, either in microwave or double-boiler depending on what type of chocolate you have purchased.  Make sure you get a good chocolate that is not too waxy and tempers properly.  It is a little more money but in the end you will be thankful for how your pretzels turn out.  I use the A'Peels by Guittard Chocolate Co which require no tempering and can be heated in the microwave.  I purchase them from the Austin bake shop, Make It Sweet.


5.  Then dip!  Dip pretzel into chocolate, tap pretzel and drizzle off excess chocolate back into dipping bowl.  You will need to let the chocolate cool on the pretzel slightly before rolling in the toppings.  Otherwise, all of the toppings will fall off the hot chocolate.  You may also choose not to roll in topping and instead drizzle a contrasting color of chocolate on top.  


6.  Let cool well, then bag individually.


Tips:
*You will need about 20 to 25 pretzel bags for one bag of pretzel rods.
* Use a tall and narrow bowl or large mug that you can easily dip the pretzel into rather than have to lay down and scoop chocolate in.
*Bag pretzels individually to keep toppings on and to keep presentation in tact.  Also a better way for those receiving to pick up.